A simple story when Allah allowed me to get P1 by combining several issues, one of which was related to “weak credentials”.
In the name of Allah, the Most Gracious, the Most Merciful.
As usual, I will try to release this write-up with two different approaches, which are:
- For those who only need the main points of this finding (InshaAllah it can saves tons of minutes if readers understanding every flow already) – please kindly see the TL;DR section, and
- For those who need to understand the flow of execution or journey about this finding. InshaAllah, it can tell the readers about some mindsets and hopefully can help people to enrich their insights.
Please kindly enjoy the story.
I. TL;DR
Here are the simple points about this issue:
- The majority of targets (*.target.tld) are protected by Cloudflare (shows “Access Denied” page).
- Find the origin servers IP (IP behind Cloudflare) via Censys.io (Autonomous System Number). Check out one of the Secjuice articles on their blog: Finding The Real Origin IPs Hiding Behind CloudFlare or Tor
- Put the target IP segment (/24) into DNSdumpster.
- Access ports 80 and 443 (for quick review only) to all IPs obtained from DNSDumpster (can be done using the “Open Multiple URLs” extension) – jazaakallahu khairan yaa Akhii harrmahar.
- Got one of the sub.target.tld using GitLab.
- There was a misconfiguration in GitLab – The “Explore” Feature is accessible to visitors and allows visitors to see a list of users who are involved in a group.
- Attempting to log in using a weak password to the acquired account.
- Found 1 account (which turns out to be admin) that uses the password: “password”.
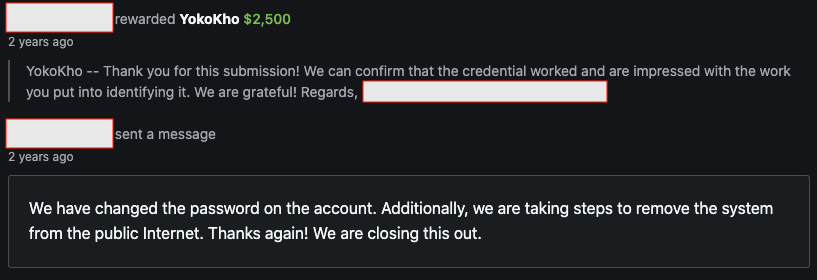
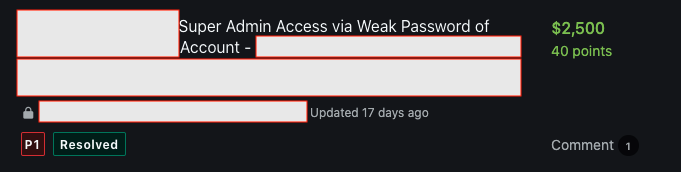
- Triaged in 1 one and rewarded in the next day.
II. THE JOURNEY
Once, I received an invitation from a program that has several domains with a fairly broad target (*.target.tld). At first I was quite happy to see this because there are not many “reward” reports with such a wide scope. However, after I enumerated the subdomains of each in-scope target, I found that most of these publicly accessible assets are protected by Cloudflare – and many HTTP/HTTPS ports issue the popular “Access Denied” message when accessed.
Had paused for a moment to be active in this program, finally Allah allowed me to remember one of the articles that was released by Secjuice on their blog: Finding The Real Origin IPs Hiding Behind CloudFlare or Tor.
Why is this technique so important to know? Because it’s quite possible that when a company implements WAF, it turns out that they have inadvertently missed their environment settings to actually hide the origin servers IP.
It should be noted that by knowing the origin servers IP, there is a possibility if the attacker will be more free to test the target because they have “passed” the protection usually offered by WAF such as rate limit, injection, and the like.
“Hidden services and the effectiveness of CloudFlare or any similar service live from hiding the origin servers IP. Simple small mistakes can reveal the IP. This allows attacking a website that uses CloudFlare directly (bypassing the WAF, Rate Limits, DDoS Protection and much more).” – Secjuice.
2.1. Search Engine for Security Tester / Security Researcher
One of the tools that can be used to find the origin servers IP is Censys. If this is your first time reading/hearing it, censys is a platform that helps information security practitioners discover, monitor, and analyze devices that are accessible from the Internet (quoted from about.censys.io).
Long story short, a tool like censys will provide deeper insight into targets that normally cannot be achieved using a search engine like Google. So it is very normal that Censys is known as one of the search engines that is often used by security testers / security researchers.
Maybe there is a question, is it just censys? Of course not. Securitytrails in one of its articles mentions that there are at least 8 other platforms that are used quite often because they have the same purpose, which can be used to find out more about the “situation” of the target.
Note: I’m just a general user (not a researcher, nor a good tester).
2.2. Find out the target origin servers IP – basic way
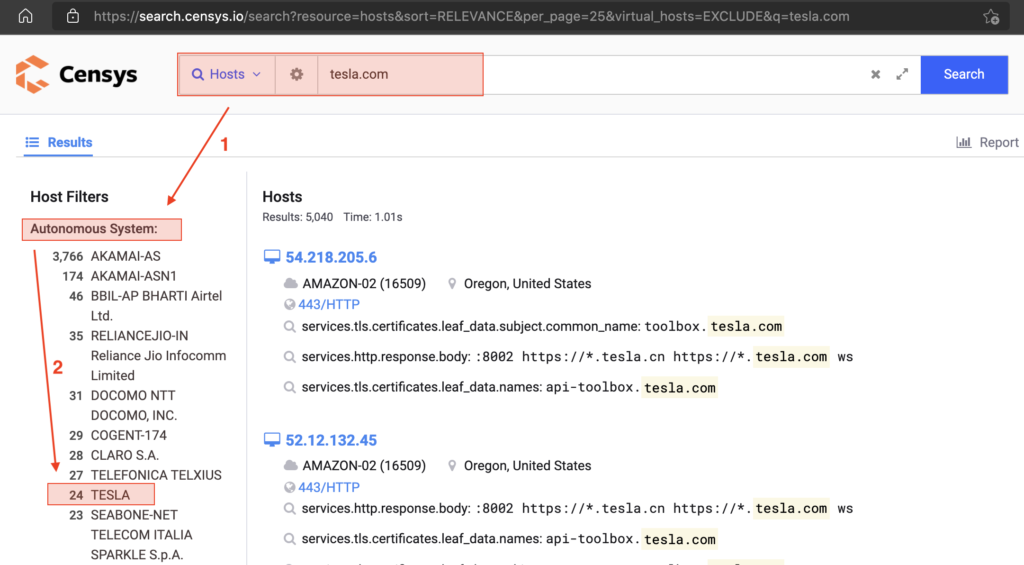
Long story short, I immediately entered the target domain into censys (https://search.censys.io/) and noticed the “Autonomous System” section.
As an information, Autonomous System Number (ASN) is a numerical identifier of a connected group of one or more blocks of IP addresses that have been assigned to an organization (quoted from support.censys.io). With this feature, it is hoped that a tester can obtain information about the IP Address that is specifically assigned to an organization.
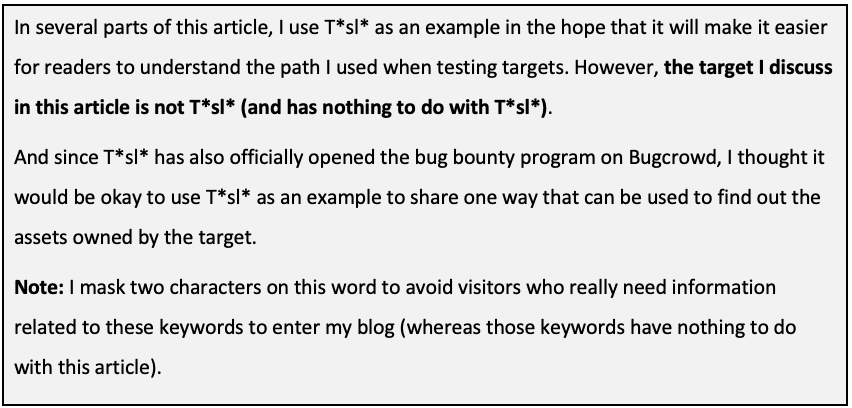
Say, our target is T*sl* – T*sl*.com (of course the case in this article is not talking about T*sl*. I use the name T*sl* just to make it easier for readers to understand). All we need to do is enter T*sl*.com into https://search.censys.io/ then take a look at the “Autonomous Systems” section which shows the specific output using the T*sl* name (remember, this is only a basic method and to speed up the search, because in reality , very likely they are using another IP block).
The next thing you need to do is click on the name of the target organization (in this case T*sl*), and Censys will automatically display the block of IP addresses used by that organization.
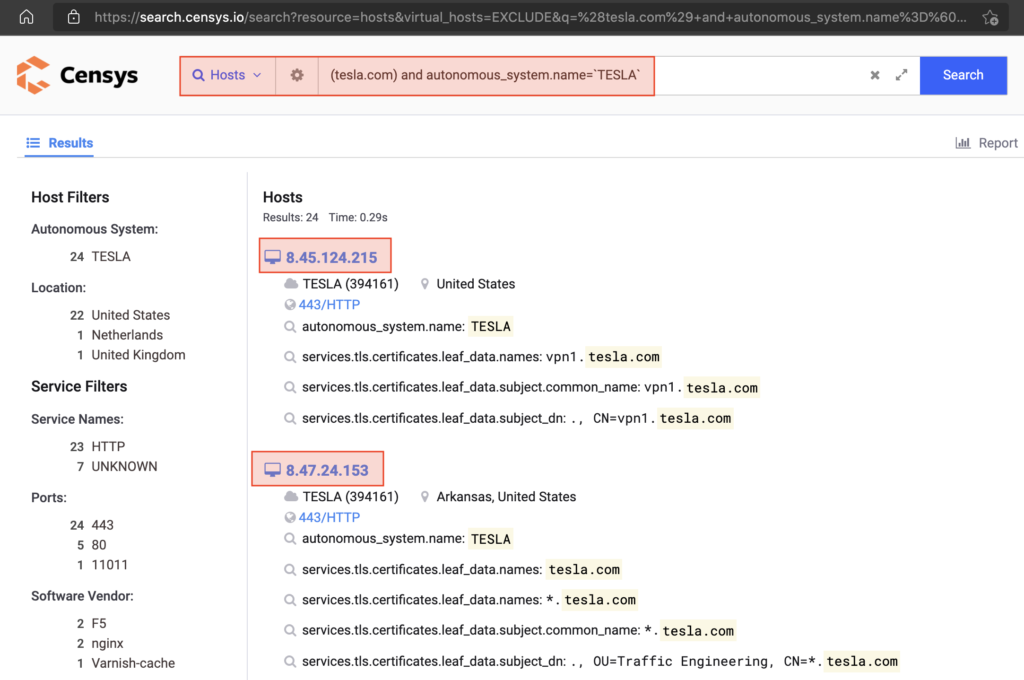
Keep in mind, even though this 2nd search only shows 24 results, we basically “can still” expand the search by looking at hosts with a /24 subnet of every host identified on censys.
For example, in the top two results, we get IPs 8.**.124.215 and 8.**.24.153. From a broader perspective, we basically have targets at 8.**.124.0/24 and 8.**.24.0/24. And in practice, we take these two segments to a tool like DNSDumpster to identify their validity (that is, really belong to the target or not).
Again, I mask two numbers on this IP to avoid visitors who really need information related to these keywords to enter my blog (whereas those keywords have nothing to do with this article).
2.3. Validate the IP Block obtained
After I get some IP “segments” from the target via censys, then I try to collect them to take to DNSDumpster. In addition to seeing for sure whether the segment belongs to the target organization, this can also help us to identify “possible” other live hosts in the related segment.
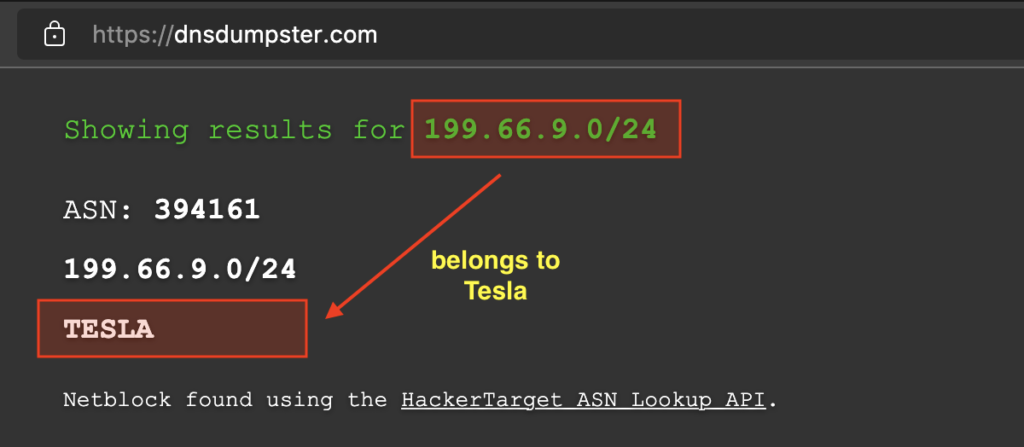
At that time I found several IP segments, so I tried to enter them one by one until finally Allah allowed me to find one segment that contained quite a lot of IP in it. (as a reminder again, I’m using T*sl* only as an example to demonstrate flow, but the target I’m talking about in this article is not T*sl*).
2.4. Looking For Possible Open HTTP/HTTPS Services
When I get a target in the form of a fairly large company like the one I am dealing with in this program, plus this target is in a public area (internet), then I use a different approach in testing which is to try to see the possibility of opening HTTP/HTTPS ports on the target.
It’s different if I’m dealing with an intranet area (directly / VPN), then I’ll avoid HTTP/HTTPS for a while by trying to do a quick test with put myself to focus on 3 things (for people who take the few offensive-technical certification and similar with it or playing around with some HTB Lab and similar with it, will be familiar with this common concept), which are:
• Test towards used accounts and passwords,
• Test towards patch that hasn’t been implemented yet (obsolete/ outdated version),
• Test towards configuration mistakes that have been implemented.
The steps to look specifically at services related to HTTP/HTTPS can be done in several ways, namely:
- By accessing default and common ports like 80 and 443, or
- By doing a broad check to other ports such as 8080, 8443, and so on. Some of the tools that can be used to process this are: aquatone (xlarge option) or httprobe.
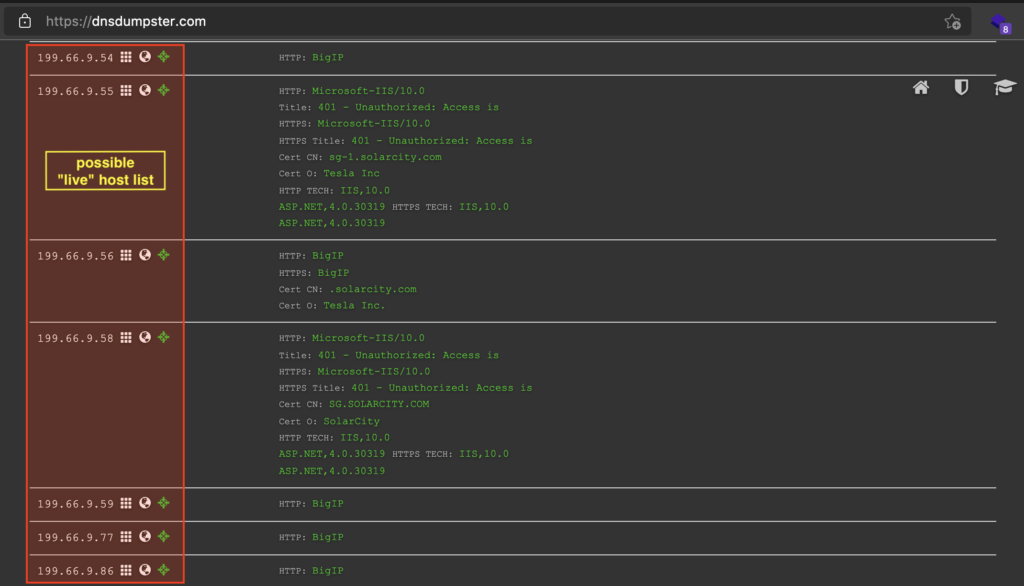
On that occasion, I tried to first check the possible active port 80/443 from the target “list” I got from DNSDumpster. To make this activity easier, we can use one of the extensions in Google Chrome called “Open Multiple URLs”.
Long story short, we can just enter all the IPs “found” by DNSDumpster and add http/https in front of each one. This is more or less what it looks like:

By clicking “Open URL”, this extension will automatically help to access all URLs that have been entered.
2.5. Finding GitLab on One of the IPs
After checking quite a lot of IPs, I finally found an interesting sight, namely an IP that appears using GitLab Community Edition. And when I checked the certificate it turned out to refer to one of the subdomains which will display the message “Access Denied” when accessed directly without going through the origin servers IP.
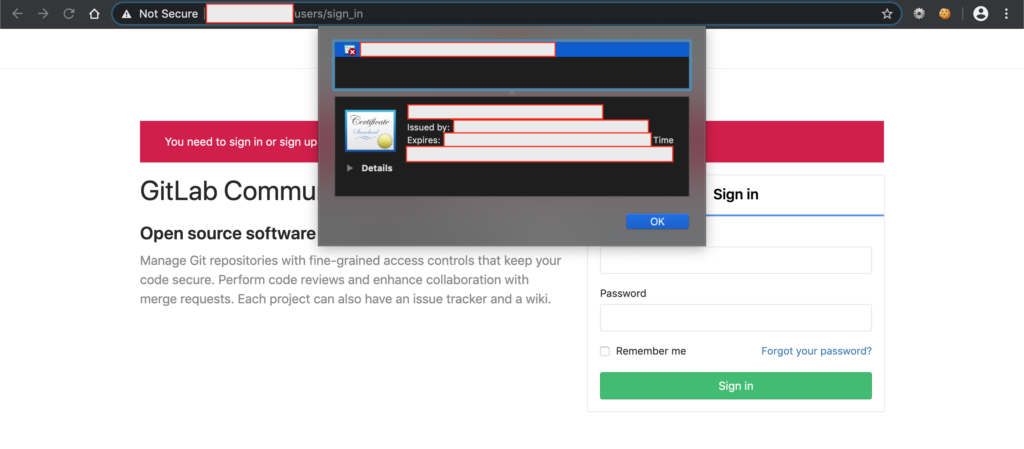
“But there’s one thing unique here: If I access the subdomain with the full path (adding /user/sign_in as seen in the screenshot so it becomes subtarget.target.tld/user/sign_in), the Cloudflare they use doesn’t block this access. However, if I only access subtarget.target.tld, I will face the “Access Denied” message again. But regardless of what happens to this unique thing, at least I can find out what’s inside this IP.”
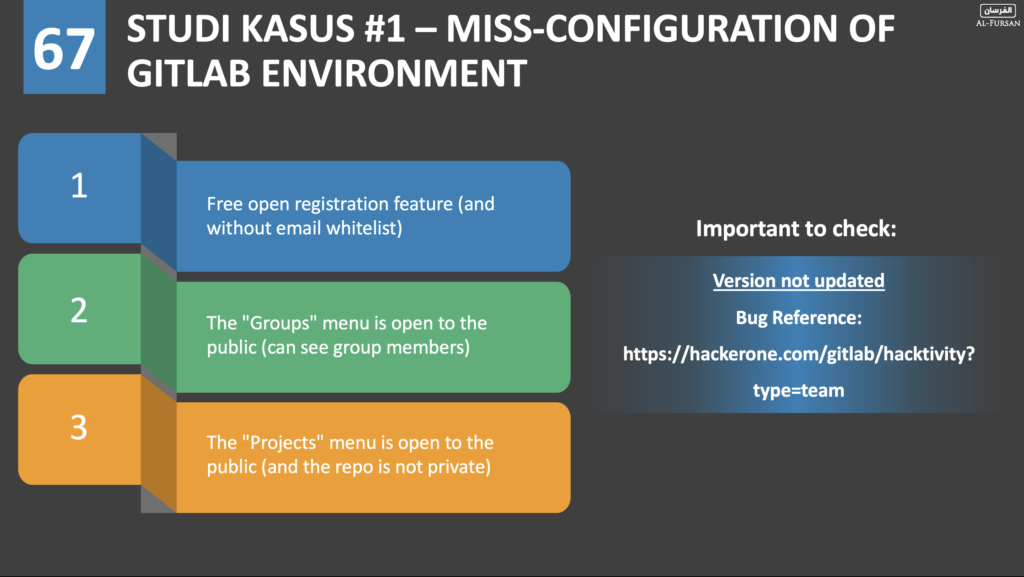
After knowing that there is GitLab on this IP, then Allah allowed me to remember 3 basic things that become common mistakes of users in implementing GitLab, namely:
- There is a free signup feature (no email whitelist). Of course this can cause the Attacker to register himself and be able to view projects that are not set to private mode. What are the after effects? Of course Attackers can see sensitive stuff in it (yes, if it turns out that there are credentials like database connection strings which are not well protected).
- There is a “groups” menu that can be accessed by the public (without logging in). By seeing this, of course, the Attacker will know the list of usernames in GitLab implemented by the users.
- And the third is the “projects” menu which can also be accessed by the public (without logging in). Of course this can cause the Attacker to see the user’s source code, including possible unprotected credentials.
Then another thing beyond these three things is the importance for testers to check for possible vulnerabilities in GitLab itself (that the maintainer may not have patched). For this, we can refer to one of the most comprehensive sources on this, namely at hacktivity menu from GitLab program in Hackerone.
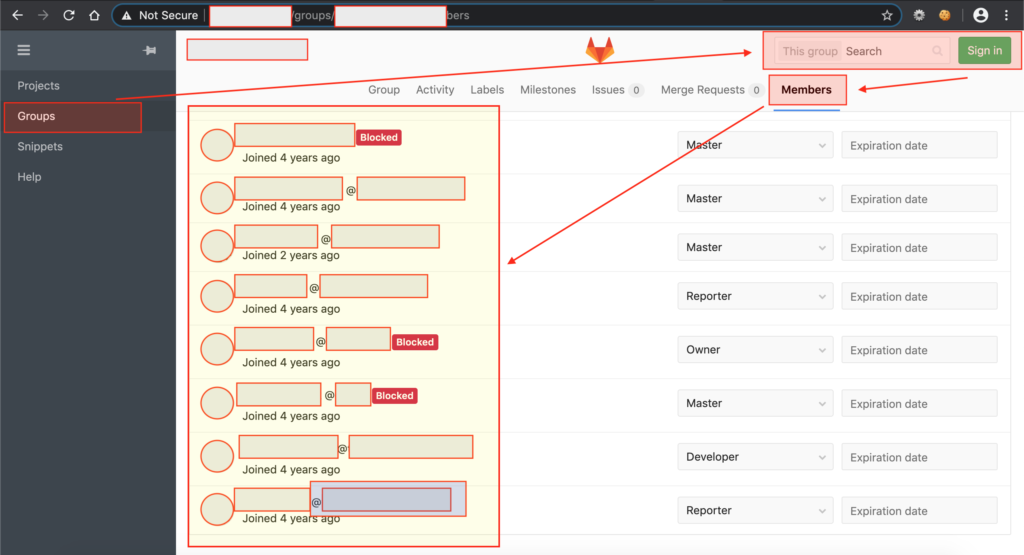
2.6. Misconfiguration on GitLab Target – Access to /explore/groups
From the 3 things related to misconfiguration in GitLab that have been mentioned before, by Allah’s permission, I found an issue in the “groups” menu on the target which is publicly accessible (without login).
As for accessing this menu, we only need to visit the “explore” menu which is generally located in the footer (or it can also go directly to the /explore endpoint), followed by selecting the “groups” menu in the header menu..
Note: I don’t have a screenshot of the explore target menu that can be accessed, but this is how it looks:


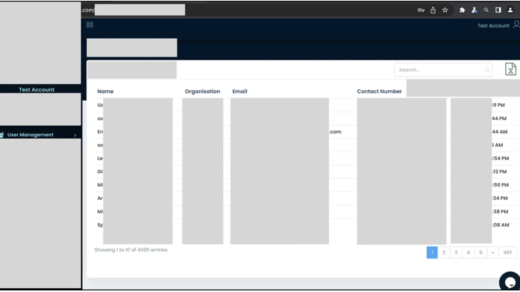
And after few analysis, it turns out that there is one group that is not “protected” so that visitors can see a list of members in the group.
2.7. Test Towards Used Passwords on Found Username
From the conditions that have been passed, it appears that I have managed to get “a small part” of the list of targeted usernames. Indirectly, having the username on the target means we are actually one step closer to logging into the target system (in this case, GitLab).
The next thing I did was try to login with various possible weak passwords such as password, Password, passw0rd, Passw0rd, p@ssw0rd, and so on.
In addition to guessing passwords in the way above, we can also try to find password patterns that are often used by a company by recon either through Github, Trello, or other collaboration platforms.
For recon via Github, I have more or less explained the flow in one of my other posts in the “collecting the credentials (whether still valid or not) and then try to find the pattern” section.
Then what happen? In the username at the very bottom, Allah allowed me to be able to login with the password: “password”. Yes, you read it right, this account uses “password” as the password value. Long story short, I also managed to see so many private projects in it.
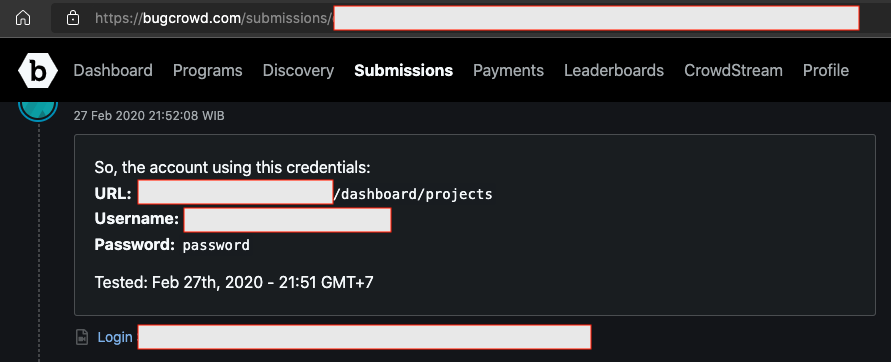
I didn’t believe it at first, so I mistook the password used by this account. However, after repeated experiments, it turned out to be correct if the password was “password”.
I immediately reported this and not long after, the program owner awarded a bounty worth P1 for this find.

III. LESSON LEARNED
So, here we are, almost at the end of the article. In this section, I would like to add a simple recap to make it easier for readers to understand few lessons of this simple journey:
- Security issue does not lie in just one thing. In reality, we can use the data from other assets to be used on the main asset belonging to the target.
- Just try going back to basics.
- Always try to find the origin servers IP of the target. Because the possibility of misconfiguration in the implementation of the security perimeter can exists (as in this case).
- In my simple perspective (just please kindly correct me if I’m wrong), recon doesn’t always mean an asset discovery activity. In this one, it can also mean that we try to learn how the application works, target’s development culture, and more.
Remember, while responding one of @Mongobug’s tweets, @NahamSec also explains about one of recon’s definitions in the very simple words: “Recon shouldn’t just be limited to finding assets and outdated stuff. It’s also understanding the app and finding functionality that’s not easily accessible. There needs to be a balance between recon and good ol hacking on the application in order to be successful”.
And the last, some people think that getting a username is not very useful. Until a sentence came out which in my opinion is quite unique: “there will be no effect (getting a username) if you can’t login with a password.” If you look at it from a simplistic point of view, then of course the sentence seems true. But in conducting the test, of course we have to look at it from a wider perspective.
Obtaining the username means you are one step closer to logging into the target system. One of the things you need to do once you get it is try to expand your search to collaboration platforms like Github, Trello, and the like to find the password patterns used. Isn’t there a possibility if the user uses the default password or the default password pattern provided by the company itself?
Remember, even Google also ever didn’t use a password to log into one of their important application (despite the unique ways required to access those apps).
Not to mention when we talk about real attacks that can also involve social engineering activities. Yes, that’s right, the VDP bounty/bug bounty program does make social engineering part as out-of-scope attack. However, when we talk about testing in reality (outside of bug bounty programs / VDP, or something like that), then we can’t forget that getting usernames will be one of the ingredients for Attackers to carry out social engineering attacks.
Another thing that I want to emphasize here is, if “how to get a username” is not accepted by the bug bounty/VDP program that you are following, do not throw away this username information. I personally wouldn’t pass up the opportunity to save any valid username information I found. Because the possibility of them changing the password with a weak value will exist (either because they forgot the old password and then replaced it with a weak one, or because they believe that no one will know if the username is registered with the service, or for some other reason).

After all, test flows like this don’t just stick to bug bounty program/VDP or something, do they? In another formal security testing job, this will of course be useful, especially if your client allows you to launch a social engineering attack.
IV. REFERENCES / CREDITS
- Finding The Real Origin IPs Hiding Behind CloudFlare or Tor – by Secjuice
- Top 9 Internet Search Engines Used by Security Researchers – by Securitytrails
- How to Seed the Censys ASM Platform – by Censys
- DNSDumpster by HackerTarget
- Aquatone by michenriksen
- httprobe by Tomnomnom
- Open Multiple URLs by tp
- Disable “explore” and “help” in Gitlab
- Bypassing Google’s authentication to access their Internal Admin panels
- From Recon to Optimizing RCE Results.
- Akhii Tomi Ashari and Akhii Widyanto Ardy Prabowo